Lesson 2.1.2: Ratio Method |
For this lesson there are 12 steps for you to take. Scroll down and do each step one-by-one. The instructions under each step will help clarify exactly what you need to do, so please read all the instructions.
|
|
Here is the Lesson 2.1.2 Worksheet
|
| ||
1.) Start Notes: Targets
Title your notes and write the targets listed below.
Title your notes and write the targets listed below.
- I can use the ratio method to create scale drawings.
- I can find the center of dilation and scale factor given a scale drawing.
|
2.) Video: Eye Dilations
This video serves as in introduction to "Dilations." Today we will be talking quite a bit about dilations, so I thought we could use our eyes as a good analogy. In this video you will see his eyes "dilate" going back and forth from big to small. |
|
|
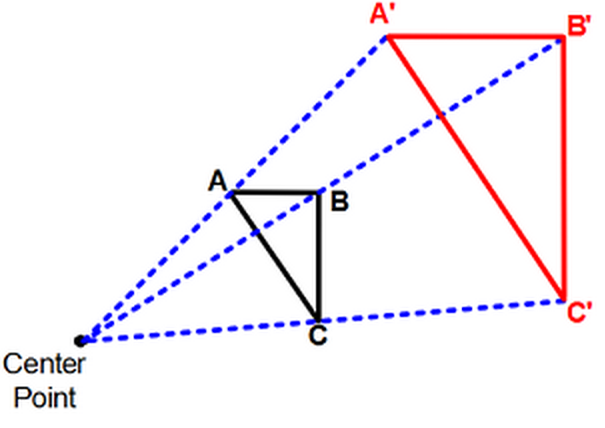
3.) Image: Dilation Example
Check out this image. This is an example of a dilation. Can you see what is going on here? Maybe you have noticed that the black triangle is a pre-image and the red triangle is the result of a transformation. This transformation is called a "dilation." In the next video I will use this image as a reference. |
|
|
4.) Video: Vocabulary
This is a very important video. Please watch and listen closely AND take all the notes. We will be using this information for the rest of this UNIT and for other units. |
|
|
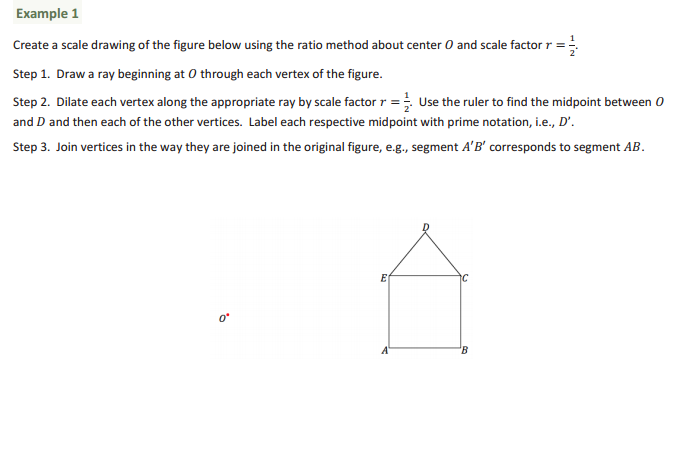
5.) Notes: Example 1
Look at the image to the right. There is a house shaped figure with a point on the outside. Copy this image and point into your notes (it doesn't have to be perfect, but it should be very similar). Then follow the directions it gives to create a scale drawing using the ratio method. When you are done, try writing the dilation in function notation. |
|
|
6.) Video: Example 1
Watch this video to see how I completed the task for example 1. |
|
7.) Website Practice
Click here to follow a link. It will take you to a website that talks through "dilations" a little bit more. Read through the entire site (there isn't much there), and practice resizing where it says "Try it Yourself." This should help further our understanding of the ratio method and dilations.
Click here to follow a link. It will take you to a website that talks through "dilations" a little bit more. Read through the entire site (there isn't much there), and practice resizing where it says "Try it Yourself." This should help further our understanding of the ratio method and dilations.
|
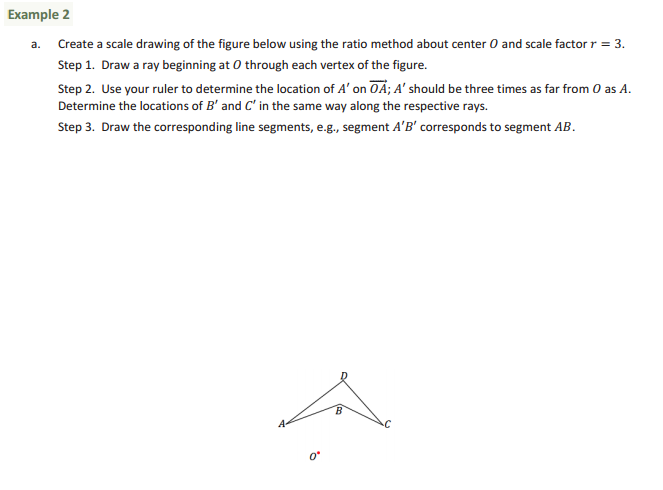
8.) Notes: Example 2
Look at the image to the right. There is a boomerang shaped figure with a point on the outside. Copy this image and point into your notes (it doesn't have to be perfect, but it should be very similar). Make sure to give yourself enough room to dilate it (have plenty of room above it and around it). Then follow the directions it gives to create a scale drawing using the ratio method. When you are done, try writing the dilation in function notation. |
|
|
9.) Video: Example 2
Watch this video to see how I completed the task for example 2. |
|
10.) Notes: Example 3
I don't have any image for you to copy this time. Instead, just follow these instructions.
If you have no idea what these directions are describing, watch the first few seconds of the next video to get you started.
I don't have any image for you to copy this time. Instead, just follow these instructions.
- In your notes, draw a line that is about 2 or 3 inches long. Make sure to draw it on one of the blue lines (if you are taking notes in lined paper).
- Move down in your notes about 2 or 3. Draw another line that is smaller than your original line. You decide how much smaller.
- Pretend your smaller line is a scale drawing of your larger line. Find the center of dilation.
If you have no idea what these directions are describing, watch the first few seconds of the next video to get you started.
|
11.) Video: Example 3
Watch this video to see how I completed the task for example 3. Plus there is an extra example at the end of the video. |
|
12.) Exit Ticket
For your exit ticket, create your own scale drawing using the ratio method. You choose what figure you want to start with and you choose where the center of dilation should be and you choose what you want your scale factor to be. Lastly, write the dilation in function notation.
When you are done, show me your awesome work. A high five is on its way :)
